Lithophanes are undoubtedly one of the most exciting ways of displaying a photo, especially for those looking at one for the first time, as the interaction between the lithophane and a light source to produce a 3D image is nothing short of amazing.
What’s even better about lithophanes is the fact it’s entirely possible for you to effortlessly produce a lithophane out of any image of your choice in the comfort of your home, as the process of 3D printing allows the creation of lithophanes without any manual work involved.
In today’s article, we will discuss whether it’s possible to create lithophanes only by using the Cura slicer, in particular, with only the image file that we would like to convert to a lithophane at hand and without the need for any external software to convert the image to an STL 3D model file.
So, can you create a lithophane only by using Cura?
It is entirely possible to create a lithophane only by using Cura, without the need for any external software, as Cura has built-in support for converting an image file to a printable 3D model file in lithophane form, which automatically happens as soon as you import an image file.
Moving forward, we will deeper examine the lithophane-creating capabilities of Cura, find out how to create a lithophane in Cura without the need for any other external software, and finally, go through the optimal lithophane settings specifically for the Ender 3.
Table of Contents
Can You Create a Lithophane in Cura?
While the usual method of creating a lithophane involves processing the image file that you intend to use through external software that converts it to a 3D model (STL) file that the slicer can utilize, being able to eliminate any extra software from the process is always welcome.
In the case of Cura, the functionality to convert an image file into a printable 3D model is already included without the need for any extra extensions, and importing an image file into Cura will automatically bring up a dialog for the conversion process.
As Cura converts both JPG and PNG files to 3D models without any problems, you should be able to get the conversion process started right away without the need to perform any modifications on the image files you currently have ready at hand.
On the other hand, it’s worth mentioning that Cura is only capable of making standard, flat lithophanes, meaning that if you would like to go for a more complex shape, such as a box lithophane or a curled lithophane, you will still need to use external tools that offer this functionality to obtain the 3D model, and slice it with Cura afterward.
How to Create a Lithophane in Cura?
The process of creating a lithophane in Cura is slightly different than 3D printing any other standard 3D model, as there are a few extra steps you will need to take, including some lithophane-specific configuration for Cura to be able to prepare the G-code file accordingly.
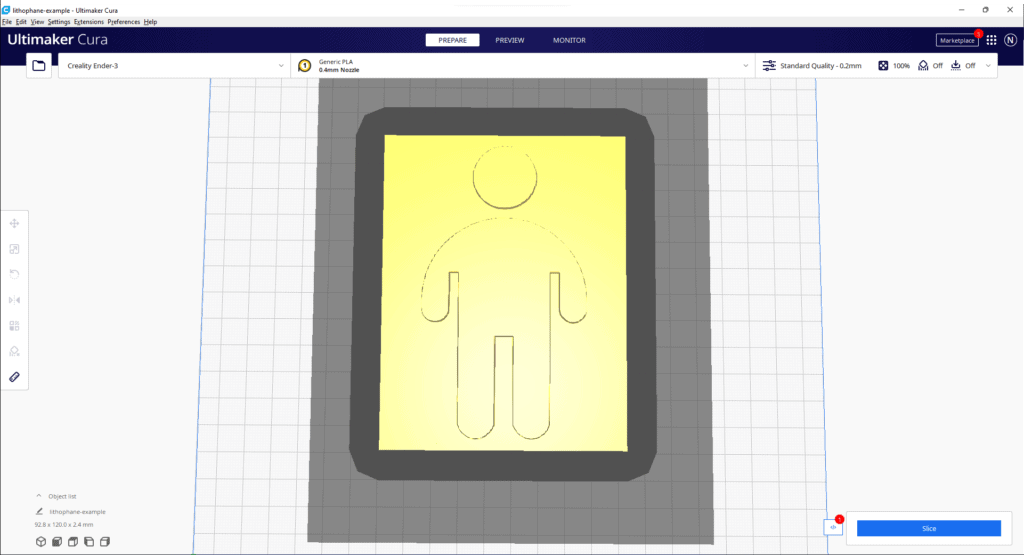
The first step that you will need to take to create a lithophane in Cura is to import the image file that you would like to print as a lithophane and configure the below parameters which Cura will display once you import the image:
- Height (mm) – The Height value determines the maximum thickness that a particular point on the lithophane can have, meaning that the more you increase this value, the less light will go through the dark areas, looking these areas look darker. We recommend using a value between 2 to 4 mm.
- Base (mm) – The Base value determines the minimum thickness that a particular point on the lithophane can have, and decreasing this value will allow more light to pass through the light areas, making them look brighter. We recommend using a value between 0 to 0.8 mm.
- Width (mm) / Depth (mm) – The Width and Depth values determine the size of the lithophane you will be printing. How you configure these values are entirely up to you, as long as the lithophane fits the build area.
- Lighter is higher / Darker is higher – This selection allows you to determine whether the darker or, the lighter parts of the images will block the light. Unless you have a specific reason to modify this setting, you should keep the default value of “Darker is higher.”
- Color Model – The color model determines the algorithm that Cura will use to color your lithophane. While we haven’t seen a considerable difference between the two options of Linear and Translucency, Cura suggests using Translucency for lithophanes.
- Smoothing – The smoothing value determines how much blur will be applied to the lithophane, making it less defined compared to the original. For best results, you should keep smoothing at 0 or use a very slight amount at most (1-2%).
Once you configure the above parameters and click the OK button, Cura will convert your image file to a 3D model that is ready to print, which brings us to the next step of configuring print settings in a suitable way to print a lithophane.

Below, we have listed the print settings that you will need to configure in Cura for successfully printing a lithophane, along with the reasons behind the decisions:
- Infill Density – As we want our lithophane to be entirely solid, with no gaps that would cause the infill pattern to be visible when light shines through the lithophane, the infill density for printing lithophanes should always be 100%.
- Layer Height – The layer height value plays a vital role in the quality of the lithophane, with the lower values producing better results. As a result, we recommend going for the lowest layer height your 3D printer can handle.
- Print Speed – A lithophane’s quality benefits from slow print speeds to ensure that all the detail remains intact. We recommend keeping the print speed in the range of 20 to 30 millimeters per second.
Finally, the last step we recommend taking is to change the model’s orientation in a way that it sits vertically (upright) on the build plate and with the longer side parallel with the Y-axis (the axis that moves the build plate), as this will drastically improve the quality of your lithophane.
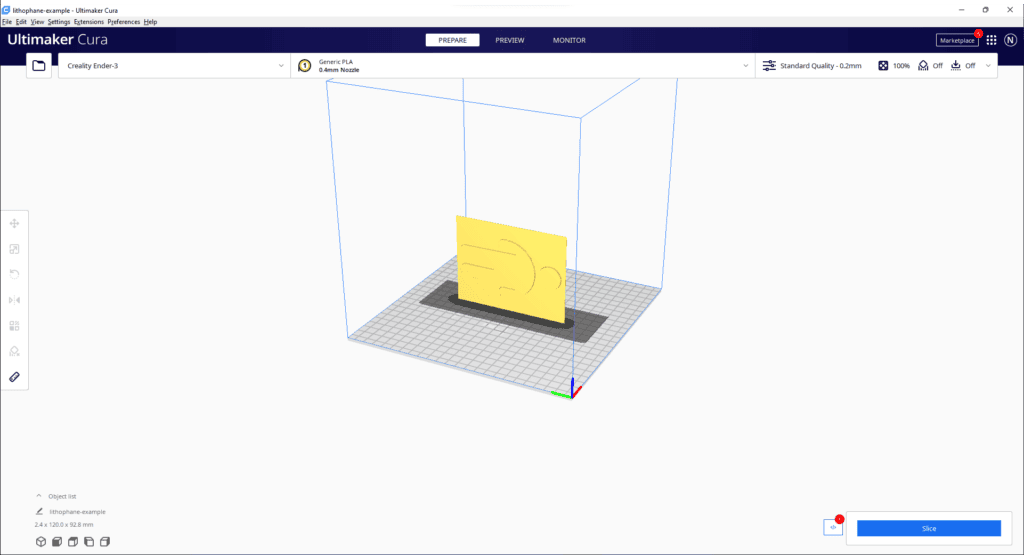
The reason to print the model vertically is to reduce filament squish and give your lithophane a better resolution, and the choice of printing along the Y-axis over the X-axis is to minimize vibrations and improve stability.
When you are through with configuring the above steps as well, your lithophane will be fully ready to print, so go ahead and click that Slice button and start the printing process when you are ready!
Cura Lithophane Settings for the Ender 3 (Pro/V2)
If you own an Ender 3 and are planning on 3D printing a lithophane with Cura, you can find the settings we recommend using for the best results, which we have specifically tested ourselves.
Below, you can find the print settings that we recommend using to print lithophanes with your Ender 3:
- Infill Density – 100%
- Layer Height – 0.12 mm
- Print Speed – 25 mm/s
While the infill density value is pretty much set in stone, as it always needs to be 100% for a lithophane, the layer height and print speed are open for further fine-tuning through testing and is something we highly encourage to print the best lithophanes possible.
Wrapping Up
Removing any external software from the process and getting Cura to handle the entire process of converting a lithophane would, without a doubt, create a much smoother 3D printing experience, as being able to use a single software for all the tasks is always more user-friendly than having to switch between multiple.
To quickly recap, you can easily create lithophanes with only Cura and the image files you would like to turn into lithophanes, as Cura will automatically handle the process of converting your image files to 3D model files that it can slice for the purposes of 3D printing.
On the other hand, it’s once again worth noting that the process of printing lithophanes is not precisely the same as printing a regular 3D printed model, which makes it vital to configure the print settings suitably for 3D printing a lithophane to obtain successful results.
Happy printing!

Mike started his 3D printing journey with the Anet A8 when it first came out back in 2017, and has been obsessed with 3D printers ever since. Nowadays, he primarily uses his Ender 3 to print functional parts that make his life more convenient whenever possible.